Adding and Editing Visual Events
Introduction

There are two different ways to either manually create Visual Events: directly in Cue Pro, or by using Pro Tools® to define the selection of the In Point and Out Points.
Edit Mode
Cue Pro provides two distinct editing modes for visual events using the Edit Mode toggle switch in the Controller Bar. This provides complete control over how selections behave.
Note: This manual is primarily written assuming Timeline Range Mode is active, which is the default behavior. Target Event Mode replicates the selection behavior from earlier versions, which some users prefer, especially for foreign versioning workflows where imported cues need fine-tuning.
Timeline Range Mode
Timeline Range Mode works like a traditional range selection, mirroring the selection behavior of most DAWs. This mode is great for:
- Bulk cue trimming and modifications
- Mass clean-ups across multiple character tracks
- Quickly selecting and nudging entire multiple events by just dragging over them — even partially
- Multi-track editing operations
In this mode, events can be selected by dragging across multiple tracks. Even partial selections will select all events within the selection range, which also appear in the Event List. Multiple events can then be edited together — for example, nudged a few frames together.
Target Event Mode
Target Event Mode enables working with discontiguous visual event selections directly from the Event List. This mode is ideal for:
- Fine-tuning rough dialogue list timings before foreign version recordings
- Working with individual cues without having to work sequentially on the timeline
- Precise cue-by-cue control
In this mode, a selected visual event stays targeted, even when scrubbing or nudging the playhead. The in and out points can then be updated individually with Shift & I and Shift & O keyboard shortcuts. This is ideal for fine-tuning roughly placed imported cues from a dialogue list, in preparation for foreign version recordings — even during playback.
To deselect an event in Target mode, simply click anywhere in the visual event tracks.
It is not possible to make timeline selections in the visual event tracks when in Target Event Mode. This is done to allow discontiguous selections in the Event List — which would not be possible with a range selection.
Automatic Mode Switching
The Edit Mode is smart and will switch modes automatically to match selections made in the Event List. For example, when in Timeline Range Edit Mode and cues are selected from the Event List that are not in sequential order, the Edit Mode will automatically switch to Target Event Mode to facilitate that selection. This is because discontiguous selections aren't possible in Timeline Range mode.
Defining Characters for ADR Cues
If ADR Cues are being added for different Characters, these should ideally first be defined in the Character Tracks section.
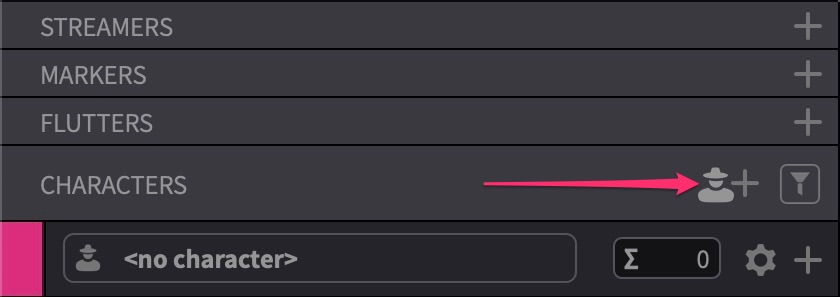
To add a new character, click on the Add New Character Track button to the right of the CHARACTERS label on the Character Summary Track, or select Add Character Track from the Track menu.
 {width=50%}
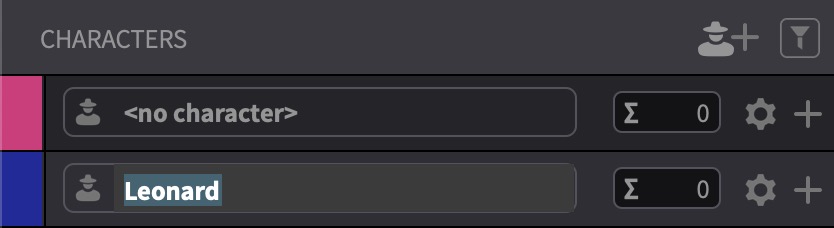
To add a character name to the newly created Character Track, click on the Character name field, & type a new character name.
 {width=50%}
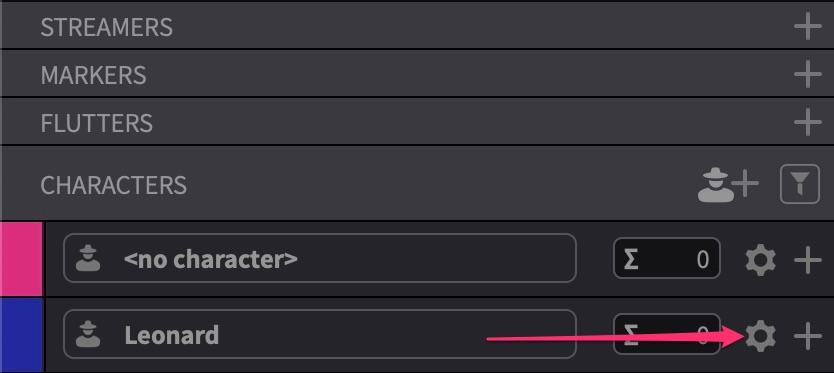
To add additional character information such as the Actor name, ADR Cue Prefix code & colour of the track, click the gearbox icon to the right of the Character name field.
 {width=50%}
The Edit Character Settings window will appear.
 {width=50%}
To add the actor's name, Click on the Actor field & enter the actor's name.
To choose a Prefix to uniquely number the ADR Cues for this character, enter it in the Prefix field.
To set a colour for the Character Lane, click on the Color field & choose a new colour in the colour pop-up that appears.
The character name can also be added or edited using the Character field.
Once done, click on the Confirm button at the bottom of the window.
Continue this process for all desired characters until each character has their own designated Character Lane defined.
If no Character Lanes are defined or chosen when new cues are added, new ADR Cues will be added to the permanent generic default Character Lane called no character, and can be moved to their respective Character Lanes later once defined.
 {width=50%}
Character Tracks can be manually arranged in any desired order, by clicking on a lane & dragging it up or down to a new position.
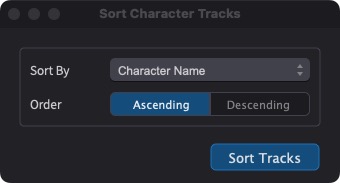
Character Tracks can also be sorted automatically by going to the Track menu → Sort Character Tracks. In the Sort Character Tracks window that appears, select which ADR Cue Proroperty to sort the tracks by using the Sort By field & then selecting either Ascending or Descending in the Order field.
 {width=35%}
Assigning the scrub audio track in the active Pro Tools session
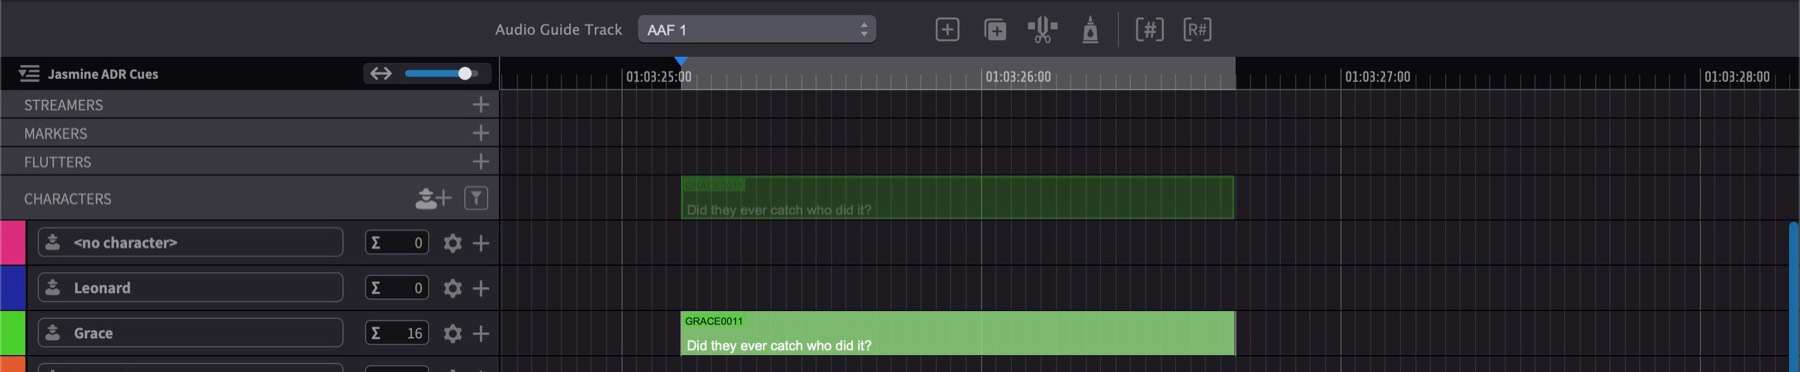
In order to hear audio from Pro Tools when scrubbing in Cue Pro, first click on the Audio Guide Track pull-down menu & choose which audio track in the currently active Pro Tools session contains the dialogue guide audio. Cue Pro only supports scrubbing one Pro Tools audio track at a time in any surround format.
 {width=90%}
A temporary workaround for hearing the audio from any track of a cascaded dialgue edit, is to create a multi-channel audio track wide enough to support the amount of mono tracks in your edit, and route the track output to your front speaker(s) (via a mono or stereo monitoring bus). Then select all your edit tracks & copy them to this track. Assign this track to the Audio Guide Track.
Navigating & Adding New Visual Events In Cue Pro
While stationary, click or drag anywhere in the Character Tracks to roughly locate to the point in the video where a cue is to be added. The [Left] and [Right] arrow keys can also be used to navigate the Cue Pro timeline. Holding down the [Option] key will move the playhead position in one second increments, while holding down [Shift] will move it in five second increments.
Press the [Space bar] in Cue Pro to initiate playback in Pro Tools. Press the [Space bar] again to stop at the point where you hear the line.
If necessary, zoom into the area using the T key, Option key & scroll up or using a pinch gesture on a trackpad.
Holding the Control key, click and drag on the Visual Event track or, if creating ADR Cue events, the specific Character Lane to scrub the selected Pro Tools track audio to find the exact In Point of a line.
To quickly create a Streamer or Flutter Visual Event or a new Marker or ADR Cue Visual Event with the default new event duration set in Preferences, press the relevant New Event hotkey (A, M, S or F).
Or to define an Out Point if adding an ADR Cue or Marker Visual Events, while holding down the Shift & Control key, click somewhere towards the end of the line to scrub the Timeline audio to find the exact Out Point.
The selection range can be confirmed in the Selection in and out counter boxes in the Controller Bar, which can be seen to the right of the main counter.
To create an ADR Cue with the selection, press A. Or to create a Marker with the selection, press M.
Press the space bar to play the visual event & check the overlays.
Hold down the Control key while clicking the play button to choose between Single Play and Loop Play modes.
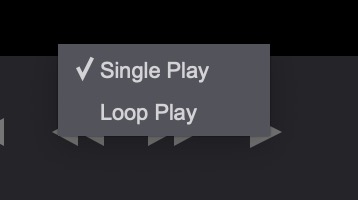 {width=70%}
Visual Events can also be created by one of the following other methods:
- For ADR Cues only, clicking the + button located to the right of the gearbox button on the desired Character Lane.
 {width=60%}
-
Using the relevant New Event command for the Event menu.
-
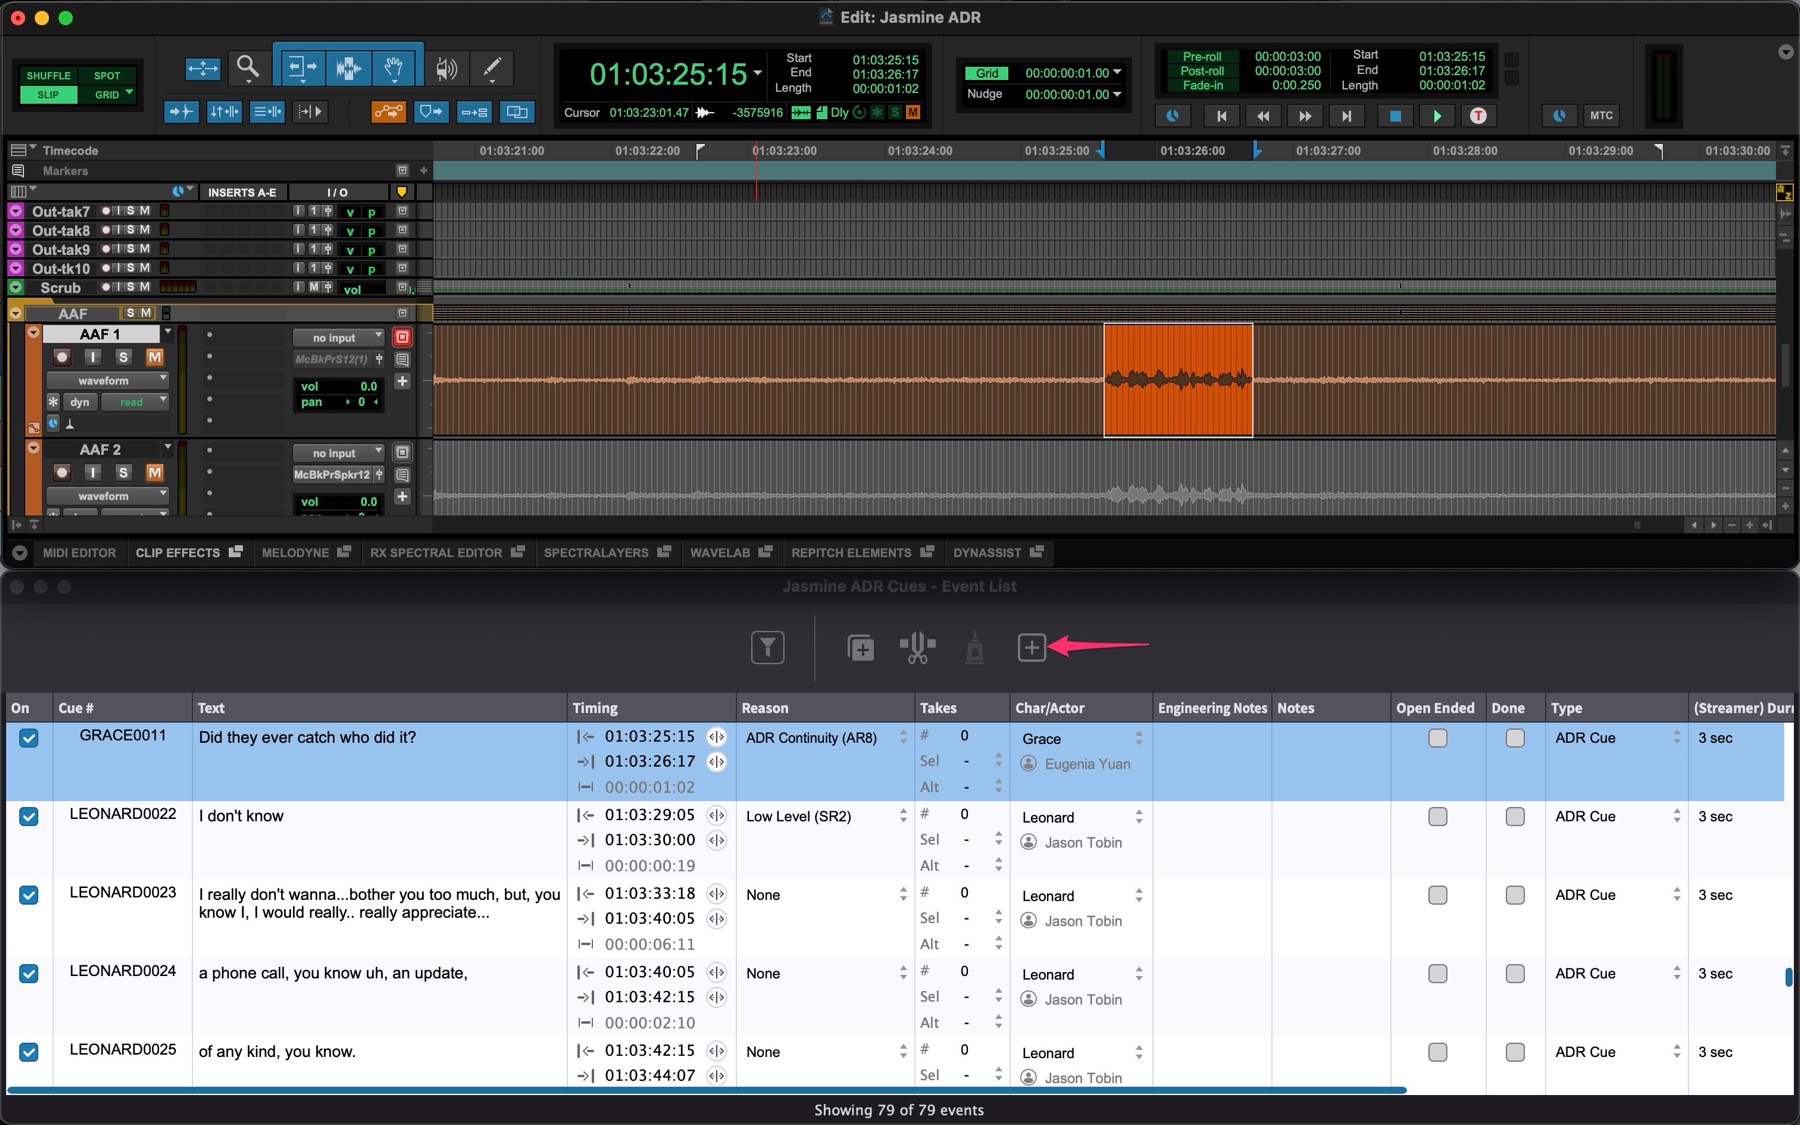
Clicking the "+" button in the Event List.
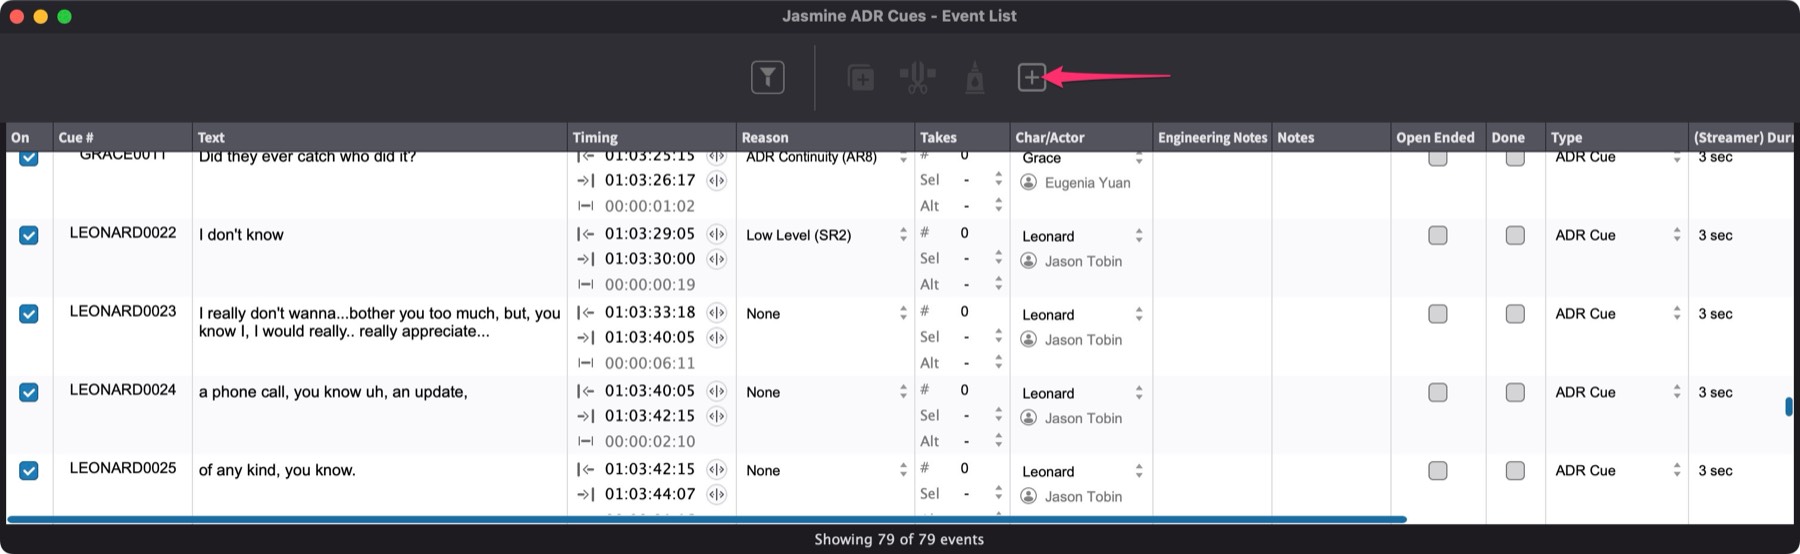 {width=80%}
Clicking the + button options in the Event List creates a new Visual Event with the type that is used most among all events in the timeline.
If the new Visual Event type supports text, The Text field will automatically be selected in the Edit Event window, to start entering text into. Click Apply when done.
 {width=50%}
Capturing and editing a Visual Event in Cue Pro from a Pro Tools® Selection
Another option to create Visual Events in Cue Pro, is using the timeline selection from Pro Tools®.
In Pro Tools®, confirm that Edit Insertion Follows Scrub/Shuttle is enabled in the Operation tab of the Preferences / Settings window.
To create a new cue, drag or scrub select a timeline selection in Pro Tools®.
Without needing to switch to Cue Pro, use the system-wide hotkey key Command+F7, or the shortcut Command+Shift+N.
Alternatively, click the Add New Event button in the Event List.
Cue Pro will create a new ADR Cue Event using the selection boundaries from Pro Tools® as the In and Out Points of the Event. To change to a different type, use the Type Field selector in the event list, once the event has been made.
Auto Text Capture from transcribed Pro Tools® text
This requires Pro Tools® 2025.10 and Cue Pro 1.1.16 or later. Creating a new ADR cue from a Pro Tools® selection that already has transcribed audio will automatically populate the cue's text field with the transcribed dialogue.
Works with the Command & F7/Command & Shift & N workflow described above.
Alternatively, the text can be selected directly from the Pro Tools® transcription lane instead of making an audio selection on a track; the selected transcription text is used for the cue, and Cue Pro derives the Pro Tools® selection from that text to set the in/out points.
When using transcription lane text selection, the in and out points derived from Pro Tools® may not always be frame-accurate and may need light refinement after import.
To change the In & Out Points of the new Visual Event, first modify the current selection, or make a new selection in Pro Tools®.
Next choose Update Current Event from DAW Selection from the Event menu.
You can also use the shortcut Command+Shift+U or the system-wide hotkey Command+F8.
Cue Pro will match the In and Out Points of the selection from Pro Tools® as the new In and Out points of the selected visual event.
Editing Visual Events in the Visual Events Track Timeline
Adjusting the In & Out Points
The In and Out Points of an existing ADR Cue or Marker Visual Event can be adjusted by moving the pointer to the relevant edge so that the trim icon appears - and clicking and dragging to a new point.
To scrub trim, hold down the Control key while trimming - which will scrub the selected Pro Tools track audio.
 {width=80%}
Another way of adjusting the In and Out Points, with a Marker or ADR Cue selected and showing in the Event List - is by adjusting the selection & selecting Set Selection In As Current Event's In Point from the Event menu (or Shift & i); &/or Set Playhead As Current Event's Out Point (or Shift+O).
These shortcuts are especially useful in Target Event Mode, where a selected event stays targeted even when nudging the playhead, allowing fine-tuning of timings during playback.
The following keyboard shortcuts can also be used to trim the In & Out Points one frame at a time:
- Ctrl & , to increase the In Point.
- Ctrl & . to decrease the In Point.
- Option & . to increase the Out Point.
- Option & , to decrease the Out Point.
Selecting Multiple Visual Events
In Timeline Range Mode, multiple Visual Events can be selected by highlighting a selection over them in the Visual Events track or Character Lanes, or by clicking the first event & then holding the shift key to select the end event in a range. Even partial selections will select all events within the selection range.
In Target Event Mode, discontiguous events can be selected directly from the Event List. Selected events remain targeted even when nudging the playhead.
Moving Visual Events manually
One or more Visual Events can be moved in the Timeline by selecting them & moving the pointer below half way in the visual event so that the hand symbol displays, and then clicking and dragging it along the timeline to a new position.
Moving multiple events by an exact numeric amount
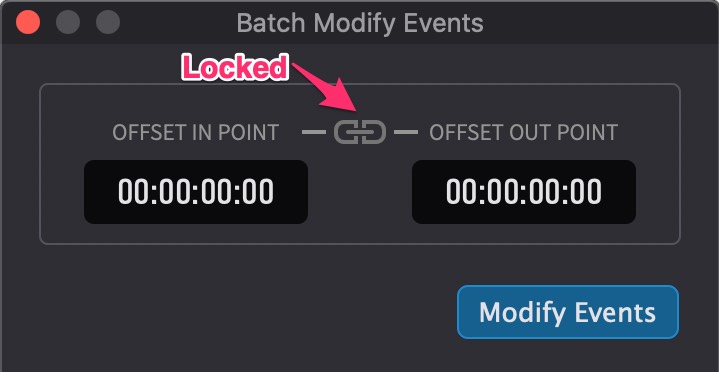
To move multiple selected visual Events simultaneously by an exact numeric amount, select them & then select Modify Selected Events from the Event menu. In the Batch Modify Events window that appears, click the lock icon, & enter an offset amount in either or both of the In Point or the Out Point fields.
 {width=40%}
The lock icon locks the duration of the cues.
Duplicating Events
Hold down the Option key while dragging one or more highlighted Visual Events to a new position in the Visual Events track or Character Lanes to duplicate them.
Or with the desired visual events highlighted, either select Duplicate Current Events from the Event menu, or use the global Apple duplicate shortcut Command+D.
Using the Duplicate Current Events function will paste the new events at the same timecode position as the original highlighted files.
Merging multiple Visual Events
Two or more Marker or ADR Cue Visual Events can be selected in the Character Lanes and merged by choosing Merge Selected Events from the Event menu, or by using the shortcut Option+Command+M.

The text fields from all selected Visual Events are automatically joined together in the order they appear - into one resultant Visual Event.
Splitting a Visual Event
A selected ADR Cue or Marker Visual Event can be split by selecting & scrubbing it in the Visual Event track or a Character Lane to find the split point & then pressing the Bkey, or by choosing Split Current Event At Playhead from the Event menu.
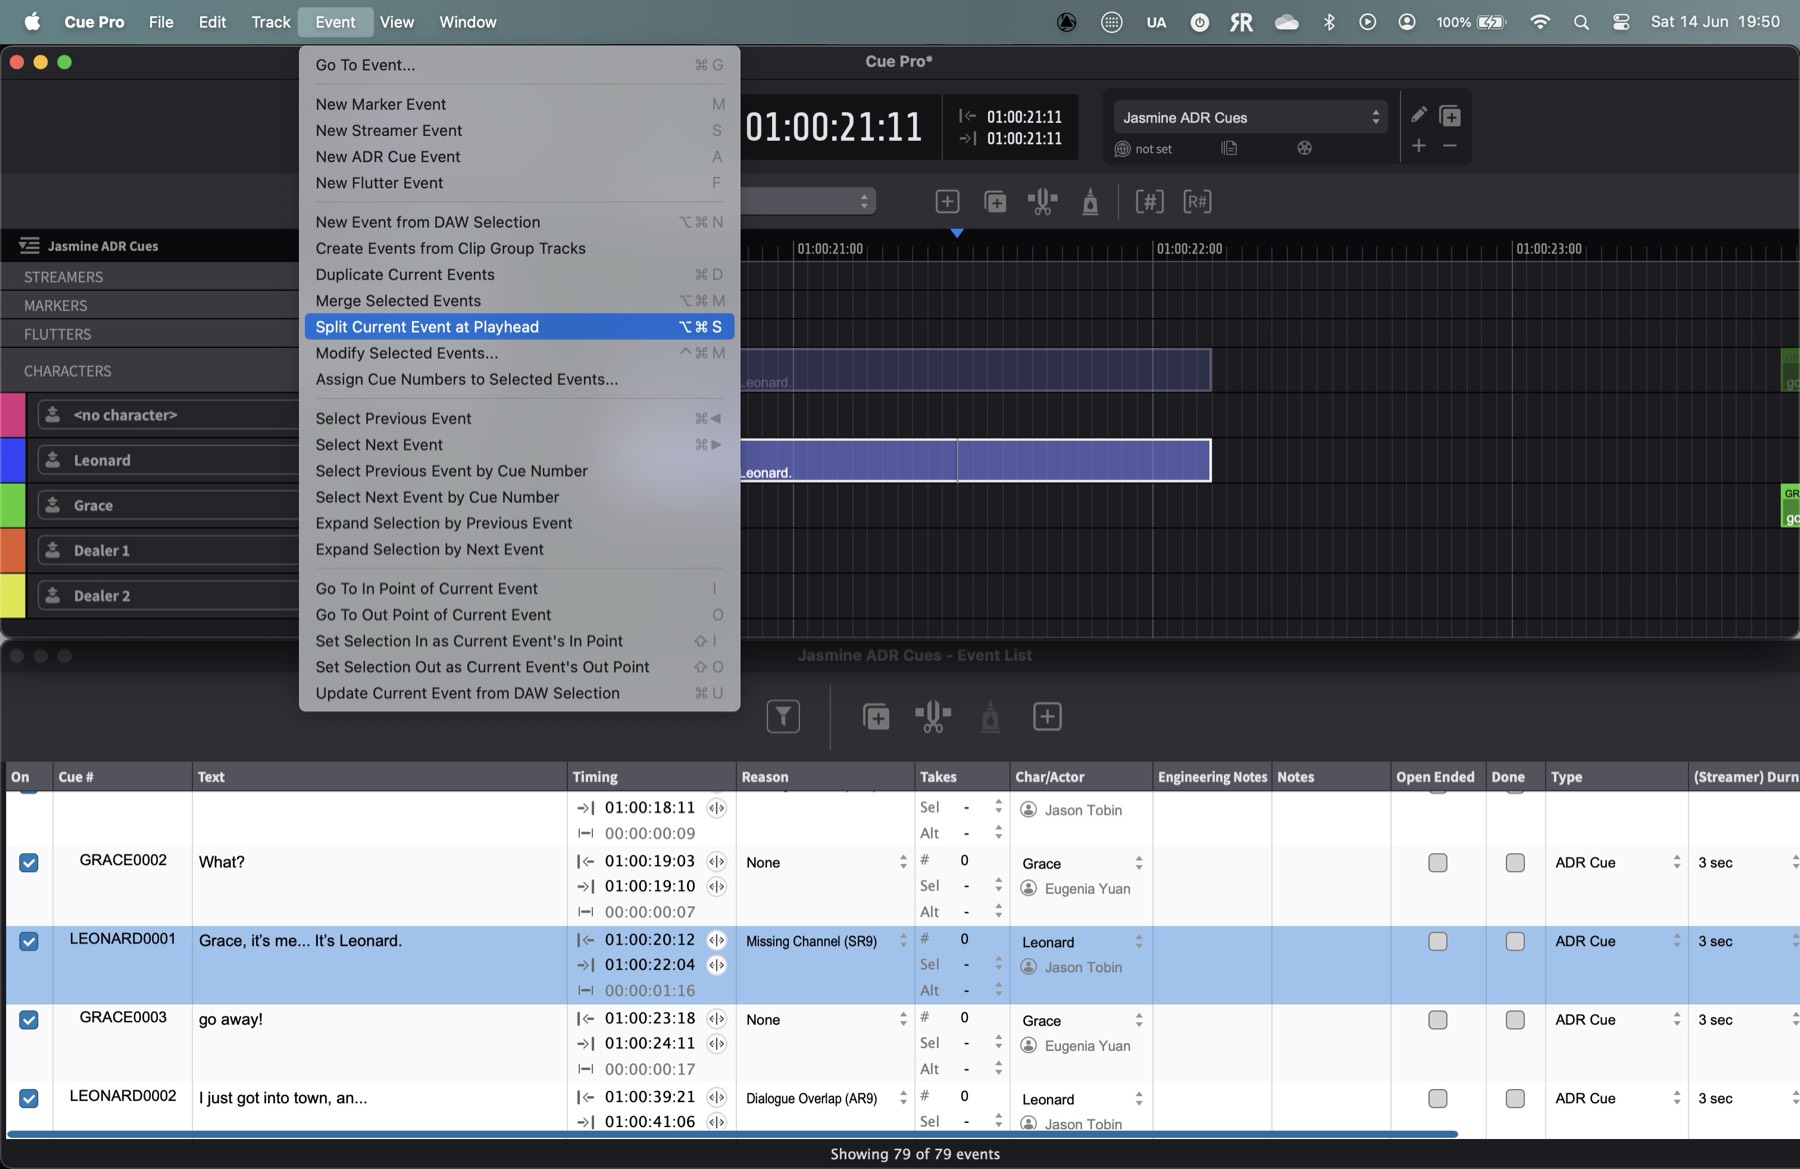
The Split Text window will appear, where the corresponding split point in the text can be chosen by clicking in the window at the desired point in the text, or using the Split Text nudge hotkeys to move the cursor:
Left / Right Arrow Key: Move Insertion Marker by one word
Alt & Left / Right Arrow Key: Move Insertion Marker by one letter
Click the Split button once done, or simply hit the Return key.
 {width=60%}
The Split Text window includes a toggle preference called Keep equal cue numbers. When enabled, both split events will keep identical cue numbers. When disabled, the cue numbers will automatically have A/B suffixes appended to them (e.g., "Cue 1" becomes "Cue 1A" and "Cue 1B").
Regardless of which naming option is chosen, selecting all split cues and playing over them will provide separate secondary timing wipes between each line.
Deleting a Visual Event
One or more selected visual events can be deleted by selecting them & then either pressing the Delete key, or selecting Remove Selected Events from the Event menu.
Muting a Visual Event
One or more selected visual events can be muted by selecting them & then pressing Command & M. Pressing again will unmute the events.
Changing the Character value of an ADR Cue
Changing the character of one or more ADR Cues can be done by clicking on the cues, holding the Control key to lock the horizontal Timeline position & dragging the ADR Cues in the Character Lanes to the desired Character lane.
Another way to achieve the same effect, is by clicking on the Character selector field in the Edit Event window or Event List & choosing the desired new character. This will also move the ADR Cues to the corresponding Character Lane.
Once the Character value has been changed, the cue numbers will also be modified after the changes in the Edit Event or Event List windows are applied.
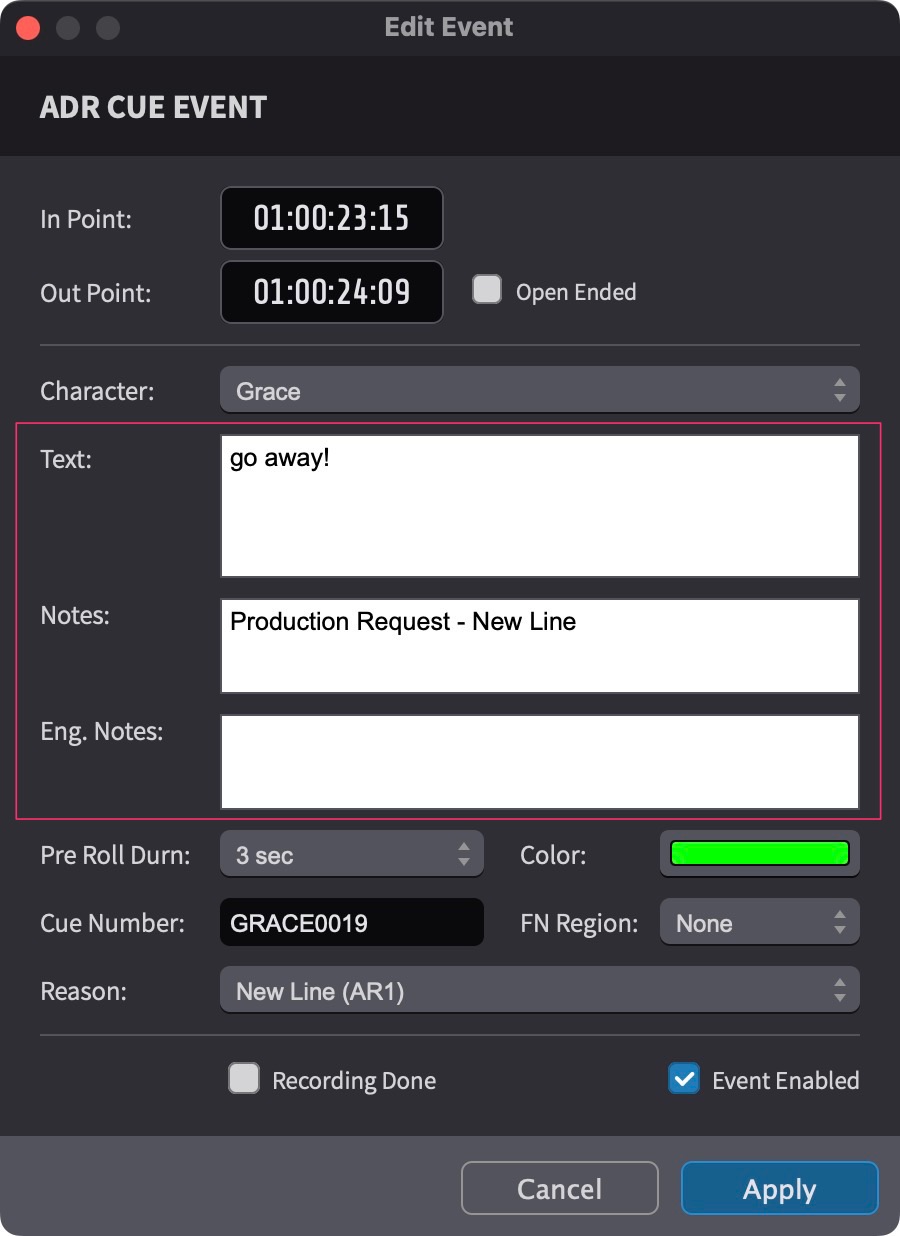
Editing Visual Events in the Edit Event Window
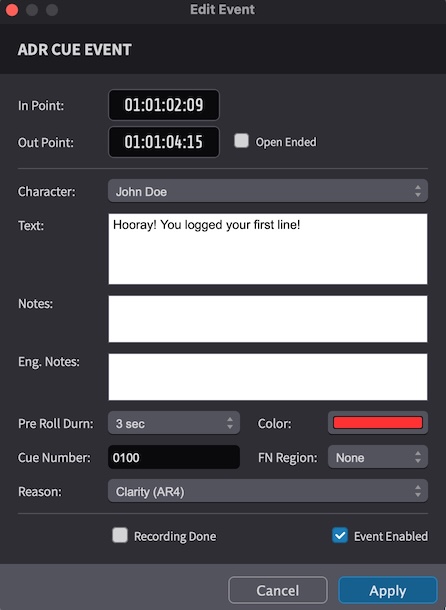
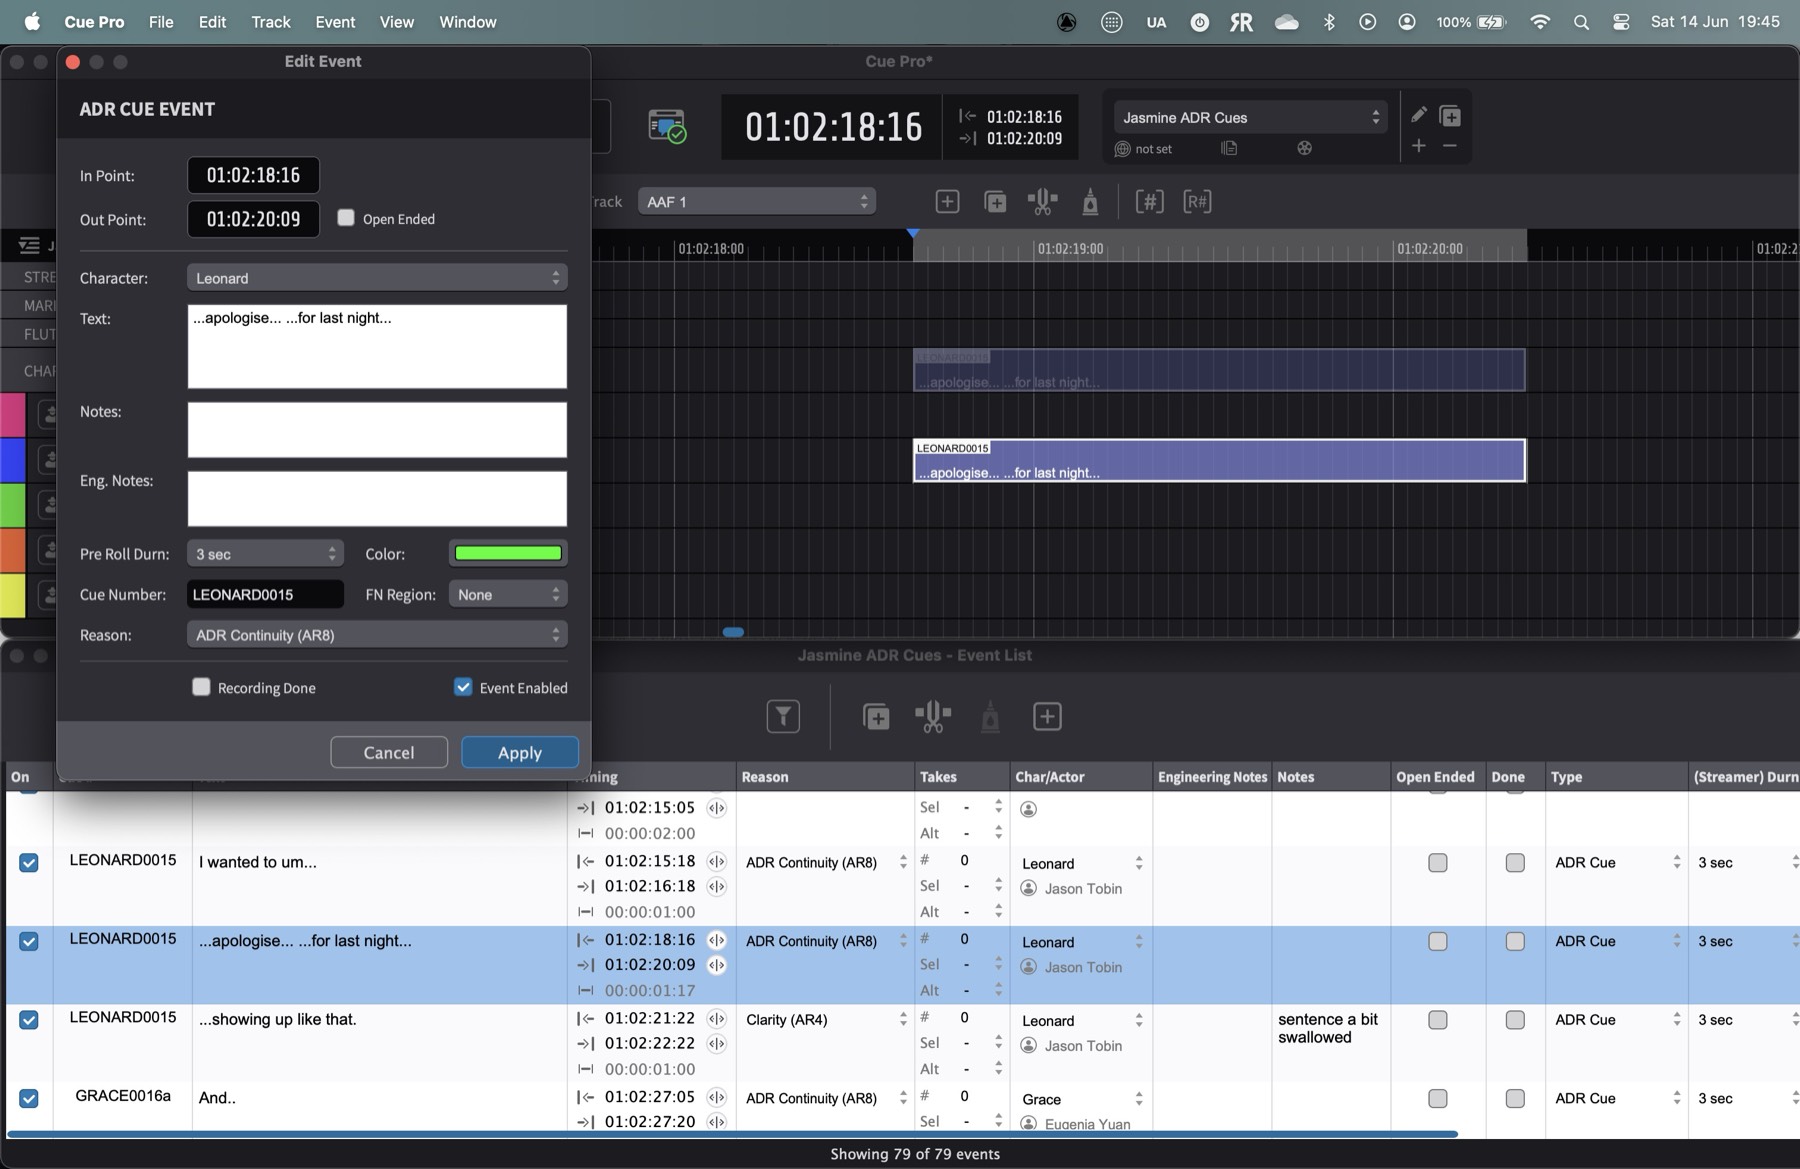
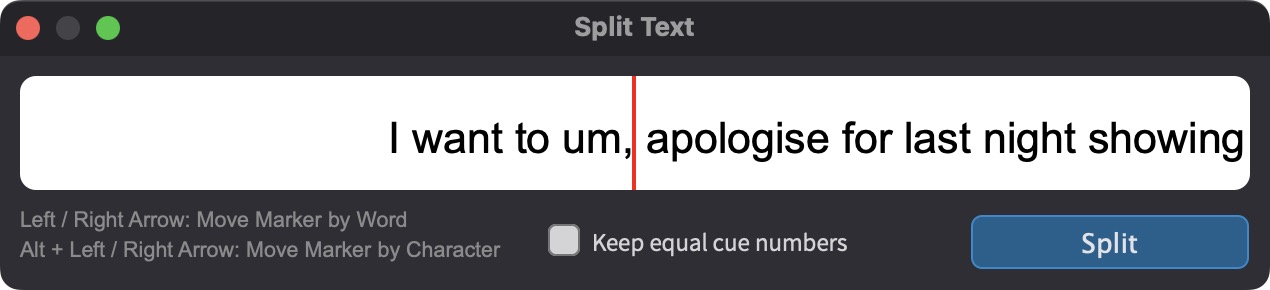
Any Visual Event's timeline position can be fine-tuned numerically, or have additional info like text added to it (where relevant to that particular visual event type) - by double-clicking it in the Character Lanes or Event List. This will show the Edit Event window - with all the relevant details for that visual event.
When creating new events from the main window, the Edit Event window is shown automatically - such that the visual event's properties can be edited immediately. For Marker and ADR Cue events, the cursor jumps straight to the text box, allowing for quick text input without having to double-click the text field.
To retype the whole timecode value manually, click the field once so that the whole timecode is selected and type the full hours, minutes, seconds and frames timecode (excluding the colons).
The period and comma keys can be used as a shortcut to enter double zeroes into the timecode fields
To confirm after any new value is entered in any boxes, either hit Enter, or just click off that box.
To adjust just one timecode field, e.g. frames - double click just that field in the timecode- so that just that field is selected, & retype the value.
It is possible to edit one field this way, without the following fields changing or defaulting to zero.
Text can also be added or adjusted in the text fields, such as Text, Notes & Eng. Notes.
Use the TAB key to tab between different fields quickly.
 {width=50%}
ADR Cue visual events also have some selectable fields such as Character and Reason.
There are also some other numeric fields such as Takes, Event Enabled, & a Done tick box to show that the recording of a specific cue has been completed.
For ADR Cue events, the in point is the first frame of the actual line, whereas the start point is the first frame of the wipe or countdown.
For Streamer events, the in point is the point where the streamer ends, whereas the start point is the first frame of the wipe or countdown.
For Marker and Flutter events, the start point and in point are identical.
While it is not possible to change the Visual Event type from the Properties window, this is possible from the Event list.
Editing Visual Events in the Event List
The Event List window shows the same information shown in the Edit Event window in the Main window, and the same result can be achieved whether event properties are modified in one or the other. The main difference in behaviour is that the Event list shows information for several events at a time, while the properties tab only shows information for the currently selected event (or for the first if more than one event is selected).
The following fields can be accessed from either the Event List or the Edit Event window:
- In / Out Points (Timing)
- Character
- Cue Number
- Text
- Notes
- Eng. Notes
- Recording Done
- Reason
- Open Ended
- Event Enabled
- FN Region
The following fields can only be accessed from the Event List window:
- Actor
- Type
- (Streamer) Durn
- Takes: Sel
- Takes: Alt
This means it is possible to select multiple items and edit them simultaneously - for example assigning certain lines to a specific character.
Click on an event in the event list to select it.
Press Cmd & Alt & A to include all events before the currently selected events.
Press Cmd & Shift & A to include all events after the currently selected events.
Press Cmd & A to select all events currently shown in the list.
Click on a desired Field heading to sort the Event List by that Field.
Click on the same field heading to switch between ascending and descending sort order.
Events will always keep their initial sort order when they have the same timecode values and the event list is sorted by timecode.
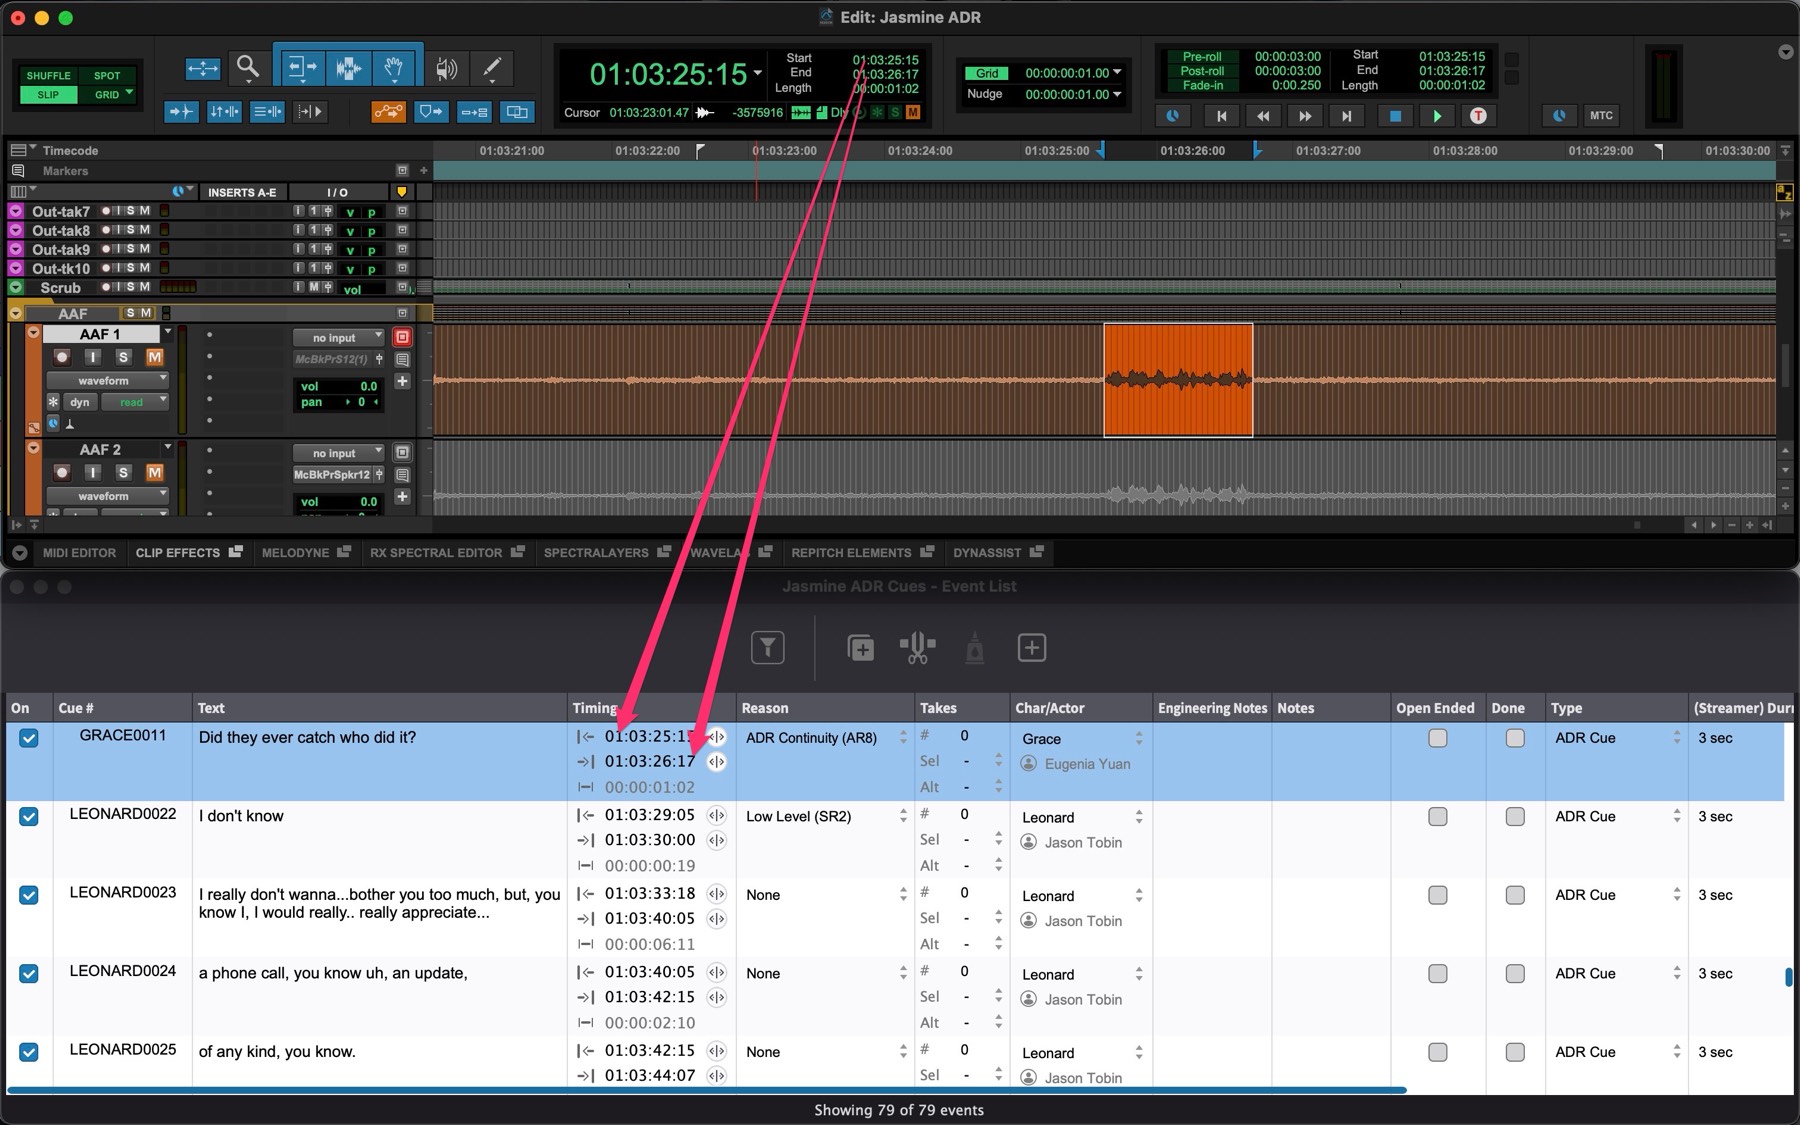
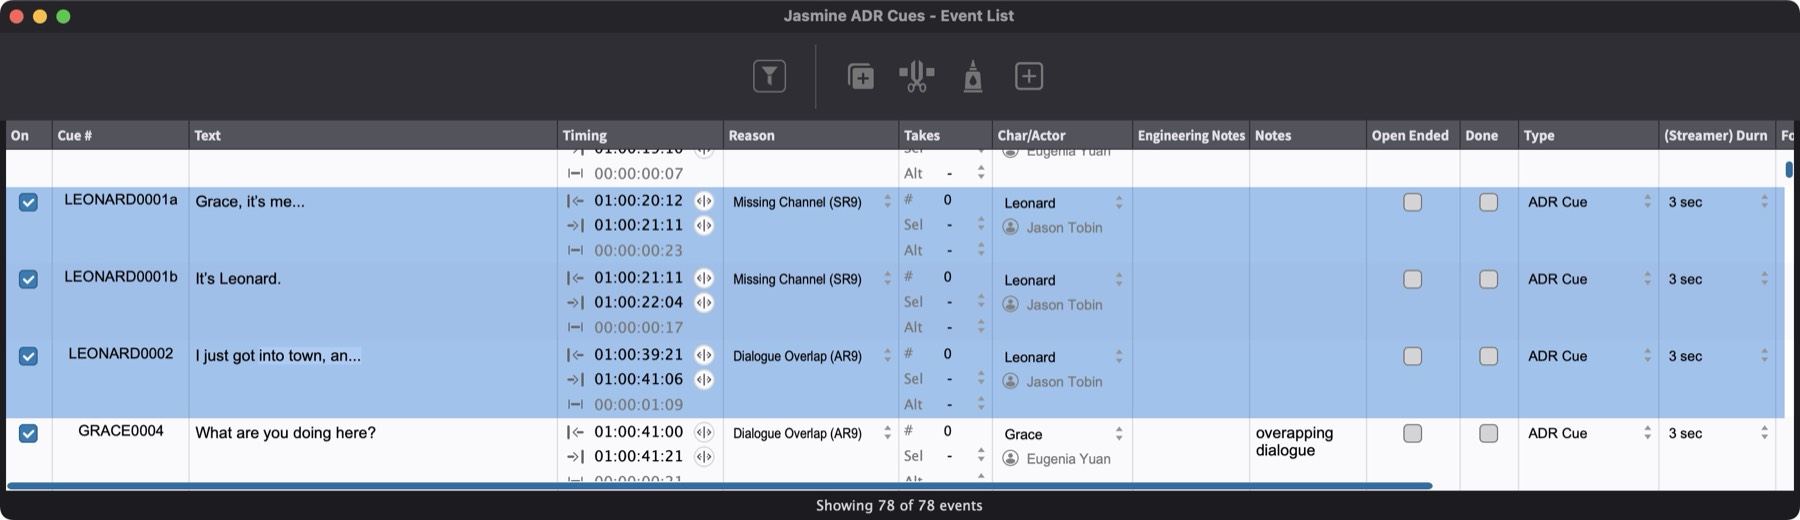
Event boundaries can be modified by dragging the timecode modifiers in the event list next to the In and Out points.
 {width=40%}
Pressing the Q, N, E, or T keys will quickly enter edit mode for Cue Number, Notes, Engineering Notes, and Text respectively of the currently selected ADR Cue visual event in the Event List.
Creating a Nested ADR Cue (Schachteltake)
To have two or more ADR Cues or Lines appear as one ADR Cue (whilst retaining their text & additioninal start & end timings) - simply assign the same cue number to them all. This can easily be done by selecting the relevant events in the Event List & entering a new cue number in the Cue field in any one of those events. All selected events will be assigned the same cue number.
To make sure that the separate Lines making up the nested ADR Cues remain selected together, the Event List can be navigated forwards by selecting **Event → Select Next Event by Cue Number, & backwards by selecting **Event → Select Previous Event by Cue Number.
A Secondary Pre-roll will be shown for each cue inside of the nested ADR Cue, & once the text of each passing cue has been shown onscreen, that text will be removed to show only the lines of the remaining cues.
The text for these nested cues will all be combined into one ADR cue in any exported ADR Cue sheets & treated as one cue in any ADR Summaries.
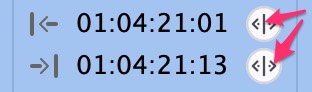
The number of Lines versus the number of Cues can be seen for each Character in the Edit Character Settings windows accessed from the gearbox icons in the Character Tracks. The window shows both the number of lines and cues for the current Timeline and also for all the combined Timelines in the Project.
 {width=40%}
Renumbering ADR Cues
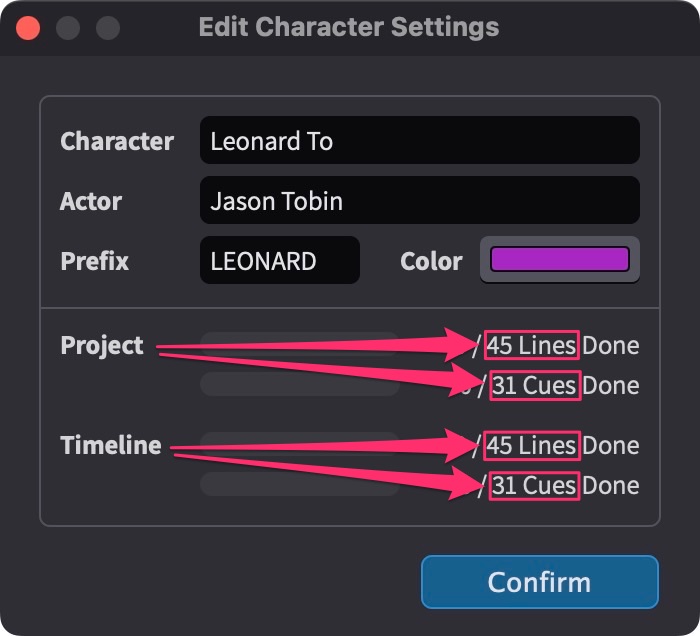
To auto-renumber any cues, select them & press the hotkey combination Shift & Control & Option & Command & E or select **Event → Assign Cue Numbers To Selected Events. The Assign Cue Numbers window will appear.
 {width=60%}
This can be done for multiple characters simultaneously, whist retaining their correct unique character Cue Number prefix.
Select By Character in the Prefix field to have each character's cue numbering start at the value set in the Starting # field.
Select Global in the Prefix field to have one counter across all characters - ie each character's cue numbering starts at the next numerical value where the previous alphabetical character has ended.
Enable Keep equal cue numbers to ensure that all existing nested ADR cues are relatively assigned their same new cue numbers.
By default, the Keep equal cue numbers option will always be enabled when the Assign Cue Numbers window appears.
The Zero Padding field determines how many leading zeros will be suffixed onto the cue numbering. For example, with this value set to a value of 1, the first cue for a character called Sue, would be SUE01.
Forced Narrative
Forced narrative events are most commonly used in forgeign language dubbing to clarify a story point not covered by the dubbed audio, but needed to follow the story in the target language.
To mark an ADR Cue Event as Forced Narrative, enable the check box in the Forced Narrative field in the Event List.
Next, using the FN Region field, choose between the four available Forced Narrative Regions: Bottom, Top, Left, or Right.
Forced narrative events will be included and displayed in Word, PDF, CSV & Excel ADR Cue sheets when exported using Bulk Export.
Reason Codes
Cue Pro provides an extensive list of reason codes to choose from to denote the exact reason why a line of dialogue is to be recorded. These can be selected from the Edit Event & Event List windows, & are divided into four main categories, each with reasons specific to that category:
- Actor
- Sync Sound
- Location
- User
Additionally, two shortcut categories- Most Used & Last Used are also provided for easy access to the most favoured reason codes.
These appear in the Reason field in either the Properties tab, the Event List, or the DAW Control window.
Here is a complete description of all the available reason codes, categories & their intended use:
| CODE | REASON CATEGORY | REASON | Use for: |
|---|---|---|---|
| AR1 | ACTOR | New Line | Production Request for a new line. |
| AR2 | ACTOR | Line Change | Production Request for a line change or amendment. |
| AR3 | ACTOR | Alt Delivery | Production Request for a change of delivery or performance. |
| AR4 | ACTOR | Clarity | Loss of clarity or intelligibility due to lack of projection or swallowing of words. |
| AR5 | ACTOR | Pronounciation | Incorrect Pronunciation |
| AR6 | ACTOR | Projection | Instances where the addition of diegetic music or sound would change the required voice projection level, eg talking over loud music in a club |
| AR7 | ACTOR | Accent | Incorrect Accent |
| AR8 | ACTOR | ADR Continuity | Additional adjacent lines for editorial continuity on the same camera angle |
| AR9 | ACTOR | Dialogue Overlap | Coverage of lines where another actor's overlapping lines are being replaced with ADR |
| AR10 | ACTOR | Breaths/Efforts | Additional breaths and efforts presence for close sync without words, or exertion like running or fighting. |
| AR11 | ACTOR | V.O. | Voice Over Addition |
| AR12 | ACTOR | Temp ADR | Replacement for poor quality Temporary ADR added in the video edit |
| AR13 | ACTOR | Swearing | Cover for Obscenities & swearing for Syndication, Airline & TV Safe Versions |
| AR14 | ACTOR | Revoice | Production request to replace with another voice actor. |
| AR15 | ACTOR | Foreign Dubbing | Foreign Language Re-versioning & Dubbing |
| SR1 | SYNC SOUND | Mic Off-Axis | Microphone placement off-axis from source. Lacking body. |
| SR2 | SYNC SOUND | Low Level | Source recorded at excessively low level. Low signal-to-noise ratio. |
| SR3 | SYNC SOUND | Distortion | Oversaturated or distorted recordings |
| SR4 | SYNC SOUND | Wind On Mic | Mic capsule distortion caused by wind on the microphone |
| SR5 | SYNC SOUND | Radio Mic Rustling | Excessive radio mic clothing or costume rustle |
| SR6 | SYNC SOUND | Boom Handling | Boom pole handling Noise or bumps |
| SR7 | SYNC SOUND | Mic Drop-Out | Sudden mic drop-out mid-performance- resulting in loss of audio |
| SR8 | SYNC SOUND | Mic Interference | Electromagnetic Interference or RF Induced Mic Noise |
| SR9 | SYNC SOUND | Missing Channel | Missing Boom or Radio Mic channel(s) for scene sound editorial continuity. |
| SR10 | SYNC SOUND | Audible Sound Edit | Undesirable or obvious audible sound edit of two separate takes from video editorial |
| SR11 | SYNC SOUND | Incorrect Sync | Correcting unmatching sync sound used in the video edit |
| SR12 | SYNC SOUND | No Sync Sound | MOS, Slow-motion, corrupt sync sound, no sync sound used in video edit |
| LR1 | LOCATION | Noisy Background | Excessively loud background room tone, skyline, hums, wind, waves, rain, cicadas, chatting, pedestrians, traffic, passing cars, airplanes, etc or other continuous layers. |
| LR2 | LOCATION | Camera & Crew | Undesirable audible crew background movement or chatter. Loud Camera or Dolly movement, as well as camera fans, mechanisms, beeps, clicking & buzzing |
| LR3 | LOCATION | Footsteps | Dialogue over excessively loud or undesirable sounding actor footsteps, or surfaces such as creaky or reverberant floors |
| LR4 | LOCATION | Props | Dialogue over sync with loud undesirable sounding props |
| LR5 | LOCATION | Modern Sounds | Where modern sounds recorded in the background of the dialogue are too modern for the timeframe of the story - eg mobile phones in Historical or Period Dramas |
Adding User Reason Codes
To add your own specific reason codes, click on the [R#] button. The Edit ADR Cue User Reasons window will appear, where your own reason codes can be added.
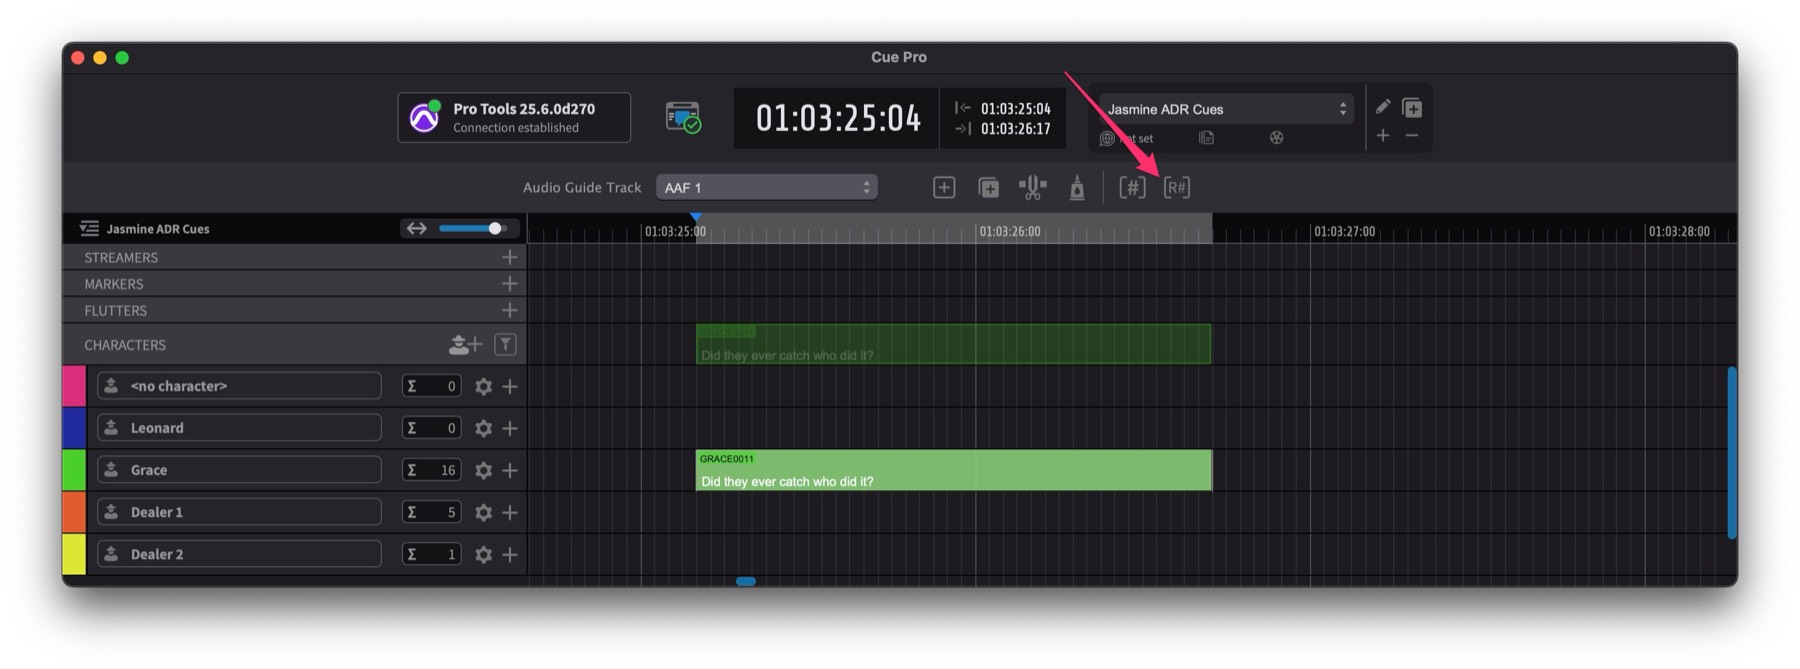 {width=50%}
There are eight additional User Reason fields which can be added in this Edit ADR Cue User Reasons window.
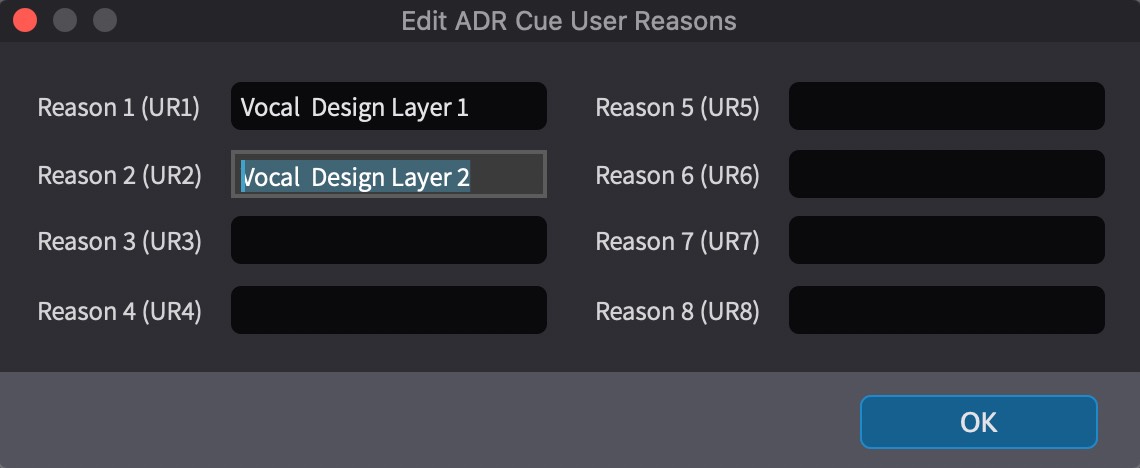 {width=70%}
These will appear in the the Reason field tab in Properties or the Event List- under the User Reasons sub-category from the Reason list.
Event Selection Playhead behaviour
There are a couple of general options which dictate how the playhead behaves when any visual event is selected. These can be found under the General tab of the Overlays Preferences.
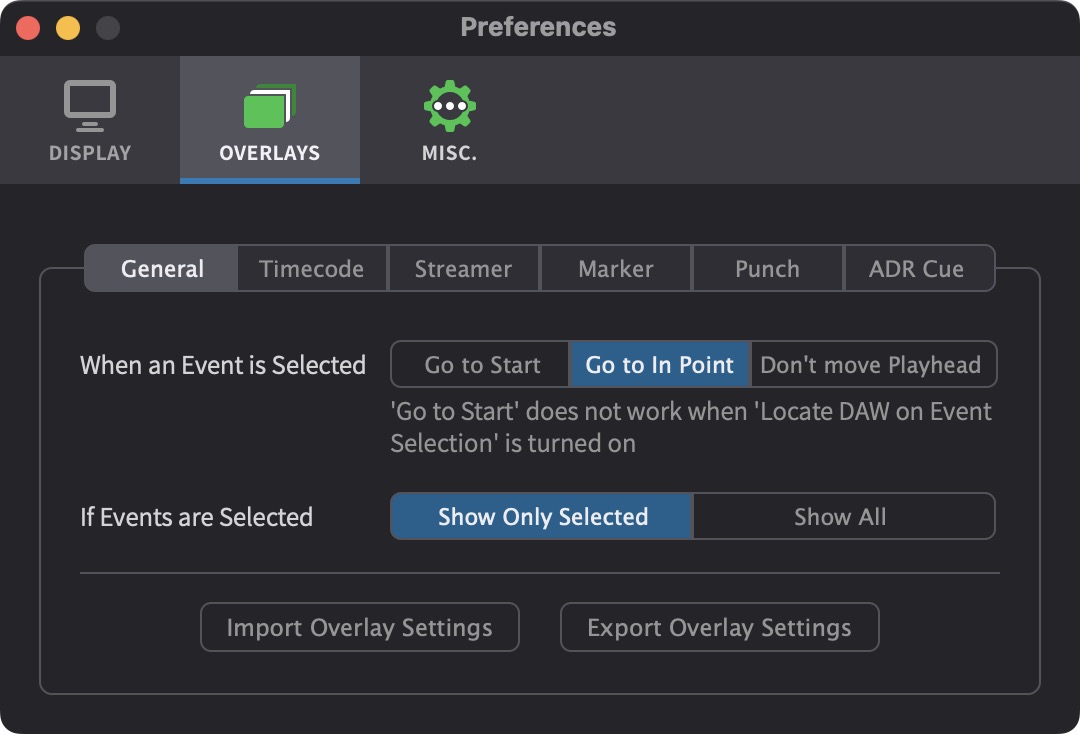 {width=60%}
When an event is selected - Go to Start or Go to In Point or Don't move Playhead - dictates whether the playhead moves to the Start of a visual event that is selected, the In Point, or does not move the current position of the Playhead.
If Events are Selected - Show Only Selected or Show All - Selects whether only the selected events are shown (if at least one event is selected); or whether all events are always shown- independent of those selected.